Protective Styles That Actually Protect: Braids, Twists, and Wigs Without the Damage
Published on September 14, 2026

The phrase “protective style” does a lot of work in a hair conversation, and most of it goes unexamined. It gets used as though the protection is automatic, as though tucking your ends away for six weeks is the same thing as taking care of them. It is not. A protective style is a trade, and whether you come out ahead depends almost entirely on three things: how it goes in, how you live in it, and how it comes out.
The numbers make the case better than any lecture. When researchers examined 874 adults in Cape Town and published the results in the British Journal of Dermatology, they found traction alopecia in 31.7 percent of the women in the study. Among those whose usual style was extensions attached to relaxed hair, the figure climbed to 48 percent. That is not an argument against braids. It is an argument about tension, stacking, and wear time, and every one of those is something you or the person in the chair behind you can change.
What a Protective Style Is Actually Protecting
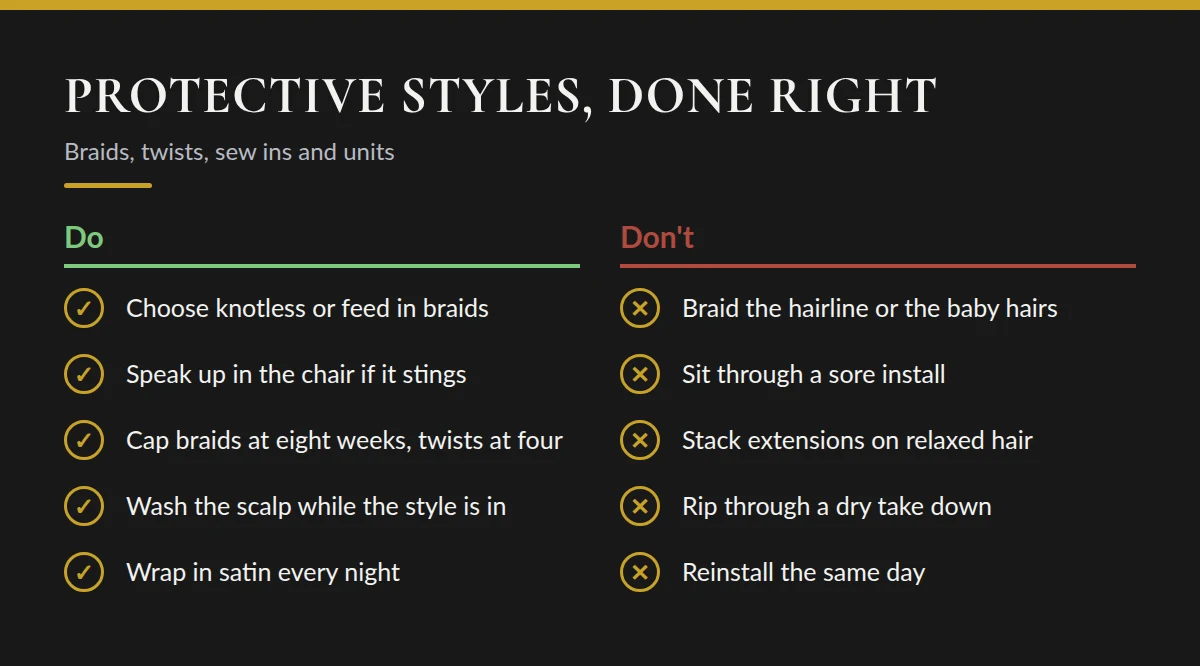
Three jobs, and a style has to do all three to earn the name. It tucks the ends away, which matters because the ends are the oldest and most worn part of the strand. It cuts down daily manipulation, because every comb pass, every restyle, every rushed morning costs you hair. And it holds moisture in, since a strand that is not being handled is not being roughed up.
Here is the part that gets skipped. In exchange for less daily handling, you are accepting weeks of steady, low-level pull on the follicle. That is the trade. It is a good trade when the pull is gentle and the wear time is capped, and a bad one when the install is tight, the hair is heavy, or the style stays in past the point where new growth changes the angle of the pull. Coiled hair is already structurally fragile at every bend in the curl, which is why textured hair breaks where it does, and tension finds those weak points without any help from you.
The Styles, and What Each One Asks of Your Scalp
Box braids. The traditional version starts each braid with a knot at the base, and that knot is where all the weight of the extension hair concentrates on a small cluster of follicles. The finer the parting and the longer the hair, the worse that math gets.
Knotless braids. The same look, built differently. The braider starts with your own hair and feeds extension hair in gradually over the first inch or two, so there is no knot and the weight builds up away from the scalp. They take longer to install and usually cost more. They are also the single easiest upgrade most people can make, and if you are choosing between the two with an at-risk hairline, this is the one.
Cornrows and feed-in braids. Tension here runs along the part line rather than at a single point, which is gentler in principle. In practice, the risk is concentration: very fine cornrows, and especially the tiny braids that run right along the front hairline, put sustained pull on the most fragile hair you own.
Two-strand twists and flat twists. The lowest tension option in the category, and the one that asks the least of the follicle. The trade is durability. Twists on your own hair are a two to four week style, not a two month one.
Sew-ins. A braided foundation with wefts sewn onto it. Two tension sources stack here, the cornrow base and the thread pulling the track down, and the failure mode is a track that is anchored too tightly to a braid that was already snug. Extensions installed over chemically relaxed hair is the exact combination that produced that 48 percent figure, so if you are relaxed, the argument for loosening everything else gets stronger.
Wigs and units. Potentially the lowest tension style available, and potentially one of the worst, depending on what is happening underneath. Braided down loosely with a satin cap and a wig that sits on the head rather than gripping it, this is genuinely restful hair. Combs that dig in at the same spot daily, an elastic band that rides the same line, or adhesive applied straight onto the hairline turn it into a daily traction habit with the evidence hidden from view.
Crochet styles. Pre-looped hair pulled through a cornrow base with a hook. The added hair is usually light and the base does the work, which makes this a reasonable middle path for people who want length without a heavy install.
Locs sit slightly outside this list because they are a long term commitment rather than a style with a take down date, and the tension question there lives mostly in the retwist. We cover that in the full guide to starting and maintaining locs.
How Long It Should Stay In
Wear time is where good installs go wrong. Every week, your own hair grows and the angle of pull at the root shifts a little. Meanwhile, shed hair that would normally come out in the shower stays trapped in the braid and begins to mat around the base.
As a working set of limits: box and knotless braids, six to eight weeks, with eight as the ceiling and not the target. Sew-ins, six to eight weeks, and closer to six if the tracks are tight or your scalp is hard to reach for washing. Cornrows, two to four weeks, because they sit flat against the scalp and collect buildup fast. Two-strand twists on your own hair, two to four weeks. Crochet, four to six. Wigs and units come off every night, without exception.
If your braids still look fresh at week ten, that is not a reason to keep them. It only means synthetic hair does not age the way yours does.
What Install Day Should Feel Like
Snug is a texture. Sore is a warning. A fresh style should feel firm and noticeably present for the first few hours, then settle. What it should not do is throb, sting, keep you from sleeping, or raise small bumps along the part lines. A headache that starts in the chair is tension, not excitement.
The hard part is social, not technical. Nobody wants to interrupt a braider four hours into an eight hour install. Say it anyway, and say it early, because the first two rows set the pattern for the whole head. “That one is pulling, can you loosen it” is a normal sentence in a good shop, and any stylist worth returning to would rather redo one braid than lose a client’s hairline. The same goes in reverse: if you are the one braiding, tell the client at the start that you want to hear it, because plenty of people have been taught that tight means well made and will sit through real pain without a word. That belief is one of the most persistent myths in Black hair care, and correcting it in the chair does more good than any product on your retail shelf.
Edges and the Nape
These two zones fail first, and they fail for different reasons.
The hairline carries the finest, shortest, most fragile hair on your head, and it is the first thing a braider reaches for when shaping the front of a style. Leave it out. Baby hairs are not structural; they are not meant to anchor anything. Ask for the front sections to start behind the hairline, skip the micro braid at the temple, and treat any adhesive or gel at the edge as an occasional thing rather than a weekly one.

The nape fails from friction and from being forgotten. It rubs against collars, seat backs and pillows, it is the hardest place to reach when you wash, and it is where small inflamed bumps tend to show up first. If bumps at the nape are a recurring pattern for you, that belongs in the scalp health conversation rather than being written off as a reaction to product.
Nights, Washes, and the Weeks In Between
Satin or silk, every night, no negotiation. A bonnet, a scarf, or a pillowcase if you cannot keep a bonnet on. Cotton wicks moisture out of the hair and grabs at the cuticle, and six weeks of nightly friction on braids is plenty of time to fray them at the ends.

Wash while the style is in. Going two months without cleansing the scalp is how buildup, flaking and itch get started, and scratching at a braided scalp does more damage than the wash ever would. Dilute a gentle shampoo in a squeeze bottle, aim it at the parts, work it in with fingertips rather than nails, rinse thoroughly and let the braids dry completely before bed. Light moisturizer on the scalp between washes is fine. Heavy grease is not, because it traps lint and buildup under a style you cannot properly rinse.
Take-Down Without Snapping Hair
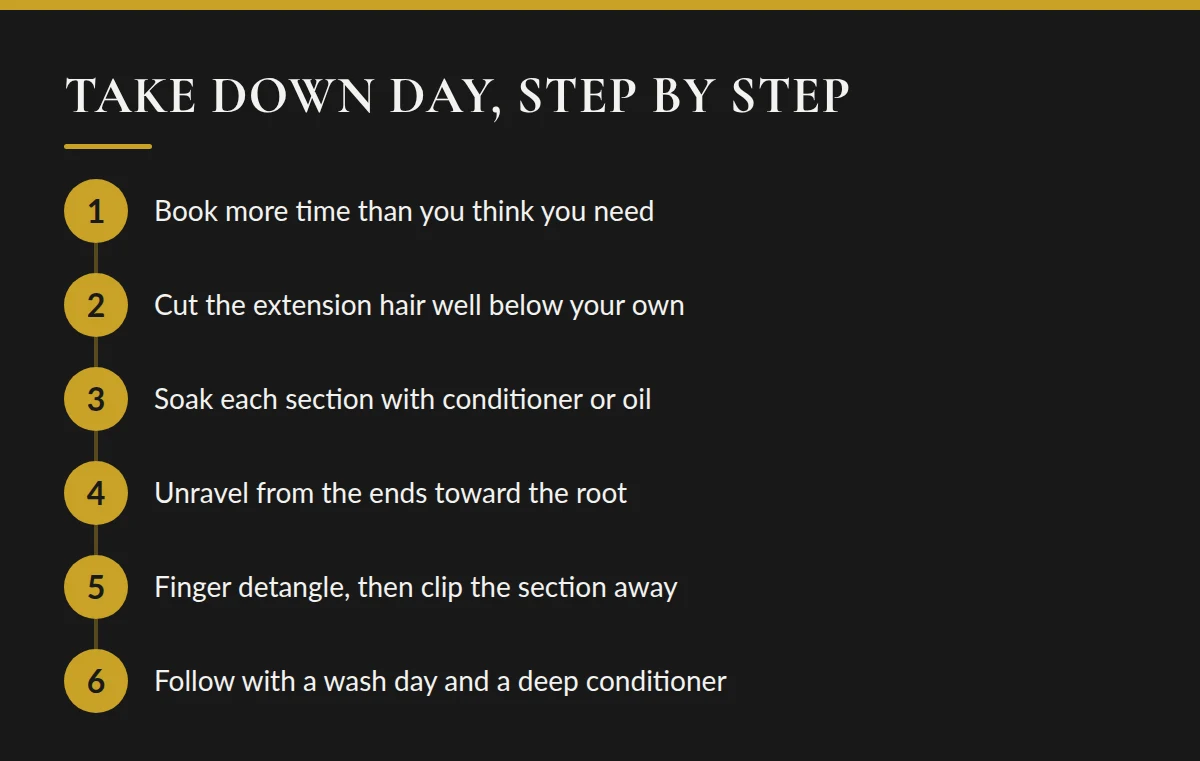
More hair is lost on take down day than on install day, and it is almost always a scheduling problem. Take down takes longer than people budget, the last hour happens at 11pm, and that is when the ripping starts.
Cut the extension hair well below where your own hair ends, so you are not dragging length through knots. Saturate each section with conditioner or oil first, because dry take down on Type 4 hair is the most expensive twenty minutes in this entire article. Unravel from the ends toward the root, one section at a time. Detangle each freed section with your fingers before it touches a comb, then clip it away so it cannot re-tangle with the rest.
Expect a startling amount of hair in the sink. Everyone sheds roughly 50 to 100 hairs a day, and six weeks of that has been sitting in your braids with nowhere to go. Shed hair comes out with the white bulb at the root. Broken hair does not. Learning to tell them apart will save you a panic, and it will also tell you honestly whether the install was too tight.
The Rest Period Nobody Budgets For
Going from a take down straight into the next install is the most common mistake in protective styling, and it is usually driven by a calendar rather than a preference. Give the hair one to two weeks off. Use that window for a real wash day, a deep conditioner, a trim of the ends that have been tucked away, and a few days of the hair simply being left alone.
That rest week is also your assessment window. It is the only time you can actually see your hairline, your density at the temples and the condition of your ends. If the edges look thinner than they did at the last take down, change something before the next install: go knotless, go shorter, go lighter, or stay out of braids for a month. Persistent thinning, tenderness or visible recession is a conversation for a board-certified dermatologist experienced in textured hair, and the earlier signs are covered in detail in our guide to traction alopecia and how it starts.
The Bottom Line
Protective styles are not the problem, and the research that gets quoted at them is not an indictment of braids, twists or units. It is a measurement of tension, weight and time. Choose the lower tension version of the style you want, cap the wear at weeks rather than months, speak up on install day while the fix is still free, keep the scalp clean and the nights satin, take it down slowly with conditioner in your hands, and give the hair a real week off before the next one. Do those things and the style protects the hair, which is what it was always supposed to do.
Sources
- British Journal of Dermatology on hairdressing practices and the prevalence of scalp disease in African adults
- Journal of the American Academy of Dermatology for a risk stratification of Black hairstyling practices
- Journal of Cosmetic Dermatology with measured differences in hair care practices and shaft fragility
- Archives of Dermatological Research on the knowledge gaps around styling and hair loss in the Black community
Further reading
- American Academy of Dermatology covering hairstyles that pull and how to lower the risk
- Skin of Color Society for patient education on traction alopecia and scarring hair loss
- American Academy of Dermatology on preventing hair damage from a weave or extensions
- Peer-reviewed research for traction alopecia and how it is treated